
by Jan Rutgers
Often, I see designers jump into a kitchen design project for a client without the information they need to produce a successful design.
Starting to “design” the project the moment you walk into the existing kitchen is not the best way to proceed. Even though you may see possibilities of moving the fridge to another wall, or expanding a window to bring in more light or even knocking down a wall to open up the space, you first need to do your homework.

Your homework needs to start with developing a process for your design work.
You, as the Kitchen Design Professional need to direct the design process from start to finish.
These are the 3 steps to follow for a successful design process:
- Information Gathering
- Design Development
- Design Presentation
Information Gathering
This step is crucial in the design process.
Spend the time to really get to know your client by exploring both their wants and needs. Ensure that all the decision makers are in the room for this stage so that you are getting all the information you need.

Designer getting to know her clients 
Discussing needs & wants for client’s new kitchen
Interview the Client
Begin by conducting an in-depth interview with the client. In one of my past blogs I wrote about the “5 Questions you must ask before designing your Client’s Dream Kitchen”. Check it out to get you started.
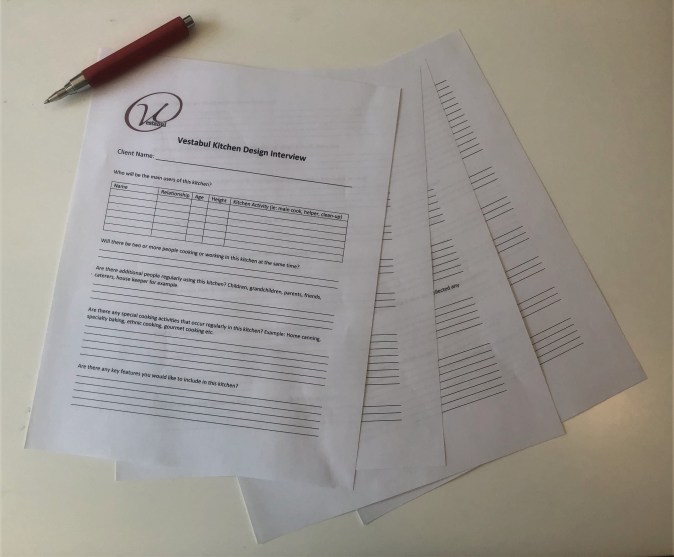
You also want to ask the client specific questions under these areas:
- The people using the kitchen and the activities they preform
- The type of food being prepared along with food storage needs
- The appliance and plumbing needs/wants for the space
- The extent of renovation clients want to undertake
- The decor style wanted for the finished room
Asking a lot of questions of your client will help you develop the best design for them. My basic Interview Questionnaire is 5 pages long and asks the questions that allows the kitchen design to be tailored to the client.
If you enroll in my course “A Beginners Guide to Kitchen Design”, the Vestabul Kitchen Design Interview is included as a download.
Review Client Inspiration Images
Once you have conducted your interview with the client and/or clients, you will want to review their inspiration images.

Pinterest Board 
Houzz Ideabook 
Tear Sheets
Most homeowners will have been dreaming about their ideal kitchen for months and sometimes years. They probably have a Pinterest Board, a Houzz Ideabook and tons of phone photos and possibly a collection of tear sheets.
Look at everything they have gathered. As the professional you will start to notice themes that will help you develop the perfect design for them.
As you identify themes or reoccurring items in their images bring this to their attention to confirm any assumptions you make.
Of course, if the client’s inspiration images are unrealistic for their space or budget it will be your responsibility to point this out and look for solutions.
Occasionally you will have a client that does not have any inspiration images. If this is the case, take this opportunity to set up a Pinterest Board or Houzz Ideabook for them, with you as a co-contributor.
This way you can see the comments they add to the images and your can add pins you find that would work for their space.
Photograph the space and gather measurements
The last part of information gathering is to gather the measurements of the space and note all existing architectural elements, mechanical systems, window placements, door placements etc.

Site Measure 
BEFORE Kitchen 
BEFORE Kitchen Wall 
BEFORE Kitchen Island
Conduct a physical measurement of the space if the project is a renovation. This needs to be a detailed recording of what is existing.
There are multiple approaches to measuring a room with this being a basic procedure:
- Draw a floor plan of the room noting all the windows, doors, and openings
- Starting in one corner. Measure each wall and all architectural elements within that wall and note them on the plan.
- Include window location from the floor, window heights and door heights
- Proceed clockwise around the space until you return to the starting corner
- Double check that all the individual measurements equal the full wall measurement
- Measure the ceiling height in multiple locations and note the lowest one
- Note the center-line of existing mechanical systems such as plumbing, venting, and major electrical
- Note any elements such as skylights, ceiling drops, HVAC items etc. on to the plan
Finally, record the existing room by taking a variety of pictures of the space. Record images from multiple angles and include details of items such as the plumbing under the sink and venting above the hood.
It is always good to take more images than you think you will need since it is nice to be able swipe through your pics to find where those light switches are beside the door!
This is also a good time to think about before & after images you could use in your marketing. By having multiple angles and images you will be able to pair up some of these “befores” with your spectacular finished kitchen!
Design Development
Design development can be a very personal thing.
Over my 25 plus years of practicing as a kitchen designer I have developed a design development process that works well for me and my practice.
By following “Form Follows Function” you can focus on getting the Science of Design correct with the Art of Design falling into place.
The functionality of the kitchen is The Science of the Design
My approach is this:
- Sketch quickly 8 to 10 design directions based on your Information Gathering.
- After evaluating your sketches, develop 3 of them into scale drawings ensuring they are technically correct. This is what I suggest:
- A design close to what the clients have requested (Everyone has an idea of what they may want so you do not want to dismiss it)
- A better version of that design (using your expertise improve on what your clients were thinking with a better layout, better storage, and a great focal point)
- A WOW design (step outside the client’s comfort zone with a creative solution that is a real showstopper. You will never sell this design if you do not present it, so go for it!)
- Produce floorplans and basic perspectives of each of the 3 Designs
Design Presentation
The design presentation will be in two parts.

Kitchen Option 1 
Kitchen Option 2 
Kitchen Option 3
First is to present your 3 concepts.
You need to feel positive about each design you present because one of them may become the design the client ultimately chooses.
Be flexible at this presentation stage and be open to combining different aspects of the 3 different designs into the final design the client implements.
Once you have the final design direction you should move on to product selection for the chosen design.
The product selection is the Art of the Design

Virtual Mood Board 
Actual Mood Board
There is still a lot of work to do to finalize appliances, sinks, faucets, cabinet doors & finish, cabinet trim, hardware, countertop, backsplash, decorative lighting etc.
Once all those decisions have been made you can produce your Final Presentation.
The Final Presentation is what you produce to allow the kitchen design to be produced and installed.
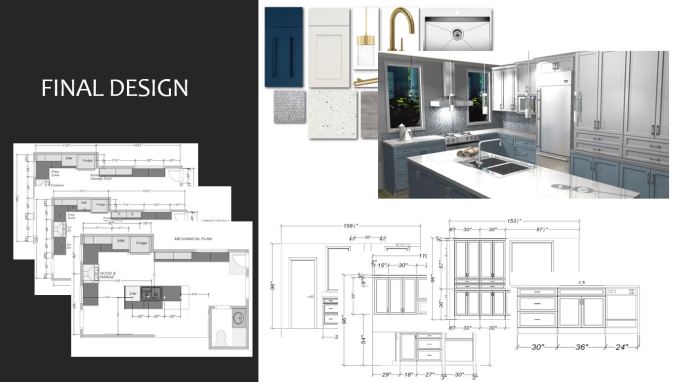
Here is what it should include:
- A scaled floorplan at ½” = 1’ or larger. Anything smaller can miss important details
- A cabinet and accessory plan identifying all interior accessories
- A mechanical floorplan
- A set of scaled elevations of each wall
- A virtual or actual color board of material chosen along with a written list of these items
- A set of perspective renderings preferably in color
If you supply products such as cabinetry, you will also want to include a quotation for the materials you will supply.
With all this documentation produced you are ready to present you client with their dream kitchen.
Let the construction begin!
For additional information and training for the Professional Kitchen Designer, please check out all the courses available at VESTABUL SCHOOL OF DESIGN. This is where you will find all the information on The Art, The Science and The Business of Kitchen Design.
Also subscribe to the VESTA Blog to have my weekly Blog delivered to your in-box.

Jan Rutgers is a Professional Kitchen Designer with more than 25 years experience. She is the founder of VESTABUL SCHOOL OF DESIGN, where she educates and mentors people passionate about the Kitchen Design Industry.

Pingback: What does a Kitchen Designer Really Do? Phase 2 – VESTABUL SCHOOL OF DESIGN
Pingback: Choosing the Perfect Layout for your Client’s Kitchen – VESTABUL SCHOOL OF DESIGN
Pingback: 10-steps-for-setting-up-a-kitchen-design-business
Pingback: Time-management-for-kitchen-designers-taking-control-of-your-schedule
Pingback: kitchen-case-study-an-updated-greatroom-design
Pingback: Why-kitchen-designers-should-charge-design-fees
Pingback: Designing-kitchens-for-different-cooking-styles
Pingback: Understanding-the-options-for-kitchen-layouts
Pingback: What-a-kitchen-designer-really-does-part-2