
by Jan Rutgers
The Craftsman Style Kitchen has become a classic over the past several years.
It is a style that many consumers are comfortable with due to its clean lines and simple details.
The key to a great Craftsman Style Kitchen is these details. Without them the design can look a bit flat.
Once you have worked out the function of your client’s kitchen and the décor style choice is Craftsman, it is time to add some details.
Read on to see my Top 10 Ways to Craft a Craftsman Style Kitchen!
1. Pick a Unique Door Style
Most Craftsman style Kitchens will feature a “Shaker” door.
A Shaker door is a 5 piece door that features a square or shaker profile on the inside edge of the stiles and rails. This is sometimes referred to as the “inside sticking”
A basic Shaker door will have equal sized stiles & rails, a recessed center panel and a square outside edge, but there are many more options you may want to explore to make your design unique and interesting.


The SALTSPRING door above represents a typical Shaker style but with the outside edge beveled. The bevel will help to soften the hard lines of a standard shaker door.
The BOWYER door plays with proportion. The top & bottom rails are 1″ wider than the side stiles producing a door with a more substantial look. The center panel is from solid wood giving the door a weighty feel.
The TEXADA door adds a center vertical element that works well in large kitchens that have wide cabinet doors. This works well when you want your design to lean Traditional.
The SONORA door uses bead board for the center panel and would work well in a Craftsman Kitchen with a Country feel.
These are just a few examples of door styles you can use to get your Craftsman style kitchen off to a unique start. Check you suppliers offering to see what else they may have to offer.
2. Install Glass Doors
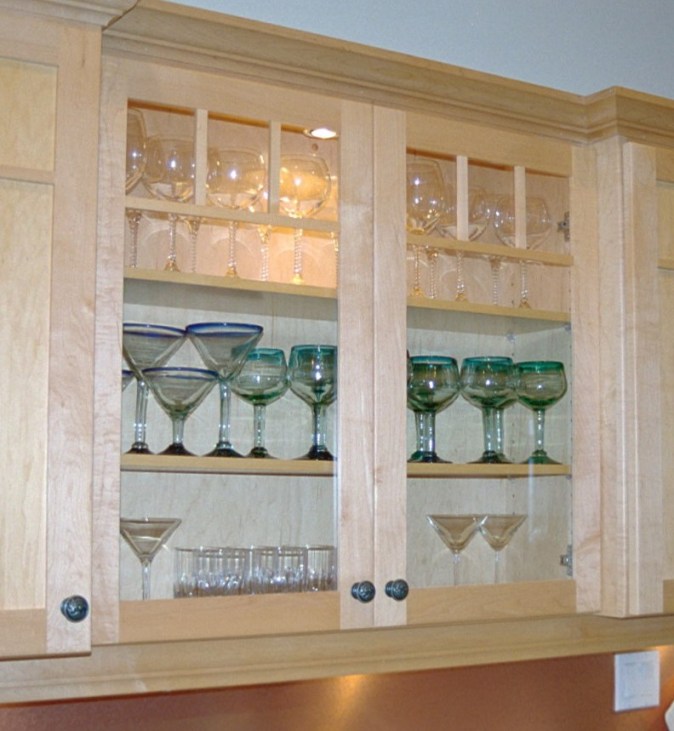
Upper cabinet glass doors with Craftsman details 
Base cabinet stained glass doors in Craftsman Kitchen
Glass doors can break up a long run of cabinetry and offer a great display space.
Look to include them in upper cabinetry or base cabinetry.
Additional detail can be created on your glass doors by adding mullions to the top of the door or by including custom stained glass panels as shown in these examples.
3. Detail the Island

Island back with Shaker panels and plinth corner details 
Eyebrow arch panels with tapered post & furniture kick
Small details go a long way, so ensure some type of embellishment is included on the back and sides of your island.
Panels that match the door style you have chosen is a good start. By adding some plinth (kick) corner details or arches you elevate the design even more.
Custom panels such as these arched eyebrow panels encased with angled corner posts are a great way to give a small island presence in your Craftsman style kitchen design.
4. Incorporate an Arch

Plinth arch 
Arched light valance
Arches can give a lot of Craftsman detail at an economical price point.
Look for areas you can incorporate an arch and you will instantly add some nice Craftsman detail.
In this first example a small arch was added to the center base cabinet in a run of blue stained units.
In the second example a defined baking area is accented by a Craftsman valance arch which brings style and shields the under cabinet lighting above the counter.
5. Design a Custom Hood

Craftsman style hood in cherry wood 
White painted hood with Craftsman details
Custom hoods can be fantastic focal points in any kitchen.
The simple lines of Craftsman style mean you do not need to design something elaborate to get a lot of impact.
The cherry wood custom hood above began with a deep upper cabinet. An arched valance and some trim was added to the bottom to make for the perfect focal point in this small kitchen.
The white Craftsman hood has a trimmed angled top with a subtle arch and panel detail on the apron. Simple detailing is all you need.
6. Accent with Bead Board

Bead board embellished doors, drawers & panels 
Bead board back panel in open shelf
Bead board is a material that finds its self at home in Craftsman style kitchens.
It is ideal to use as end panels, backs of islands and as the center panel in cabinet doors.
To elevate the look of an open shelf, install bead board in the back of the cabinet. This adds texture and also works well behind plain glass doors.
7. Include Craftsman Posts

Full taper Craftsman leg with metal cap 
Craftsman leg with tapered end in cherry wood
Craftsman style posts have either a gradual or sharp taper at the end.
When a post is needed in a design to support a counter over hang or to provide a furniture look, remember to add this taper.
The island worktable in the first example also includes a metal cap on the bottom of the post. Originally these were added to the bottom of table legs to protect the wood from the heavy use of water when cleaning the floors.
The tapered end of the cherry post example gives a lighter feel to this post that a straight chunky post would not.
8. Frame Cabinets with Pilasters

Tapered pilaster beside base drawer bank 
Fluted pilasters either side of upper cabinet
Pilasters are elements similar to posts but you only see the face of them in millwork design.
The pilaster added to either side of this set of slab drawers adds a finishing detail in this Craftsman Kitchen. Having all those drawer fronts as 5-piece construction would have been too busy in this design.
Pilasters also work well to define upper cabinetry. In this Craftsman inspired cherry kitchen, fluted pilasters bookend an upper cabinet that comes down to the countertop.
9. Specify Apothecary Drawers

Apothecary drawers with shaker fronts 
Apothecary drawers with slab fronts
Apothecary drawers were one of the first know cabinet organizational systems.
They were originally used by pharmacist to organize their products and made their way into kitchen design for the same purpose.
Including apothecary drawers provides a detail that harkens back to the past but keeps the modern cook organized.
The cherry Craftsman kitchen above included apothecary drawers in the bake center for small items where as the walnut unit ideally stores specialty teas in the beverage service area in these convenient little drawers.
10. Chose the right Hardware
Bell handles 
Wrought iron hardware 
Hammered metal hardware
To finish off your client’s Craftsman style kitchen, chose the right hardware.
Bell handles are an authentic look and are available in every finish.
Wrought iron metal back plates with swing handles give the look of being hand forged and are perfect for this style of kitchen.
Also look for hammered metals with punched square details for a great way to finish off your Craftsman design.
As you can see it is details that define the Craftsman Kitchen. When you combine even small details you are well on your way to developing your client’s dream kitchen.
I would love to see what details you use to produce Craftsman Style Kitchens for your clients.
Comment below so I can share with everyone.
Also don’t forget to subscribe to the VESTA blog to recieve info on all things Kitchens delivered to your inbox!

Jan Rutgers is a Professional Kitchen Designer with more than 25 years experience. During her career she has designed over 1000 Kitchens learning valuable skills with each one! She is the founder of VESTABUL SCHOOL OF DESIGN where she educates and mentors people passionate about the Kitchen Design Industry.
