
by Jan Rutgers
I began my Kitchen Design career more than 25 years ago.
At that time, the focus was on selling boxes to new home builders more than designing functional spaces for families.
Within a year of working in the industry, I saw that things could be different and that I needed to bring more “design” to my job to inspire me to continue in this profession, and provide my clients with better solutions.
When I was scanning my images of past projects looking for a topic for my VESTA Blog post this week, I was reminded of this.
So, for my next few posts I am going to share with you some of my earlier design solutions with hints on how I would update them for today’s consumer.
For these posts, I gave myself some criteria:
- The solutions I would present had to be from Kitchens I designed 10 to 20 years ago.
- I would be OK with so-so images since Instagram didn’t even exist back then and I wasn’t hiring photographers. (All the images here are from my old digital camera!)
- I would be honest with my readers and let them know if I would implement these design solutions today.
Appliance Solutions
I will start with appliance solutions from Kitchens I designed in the 90’s and early 2000.
I had studied ergonomics while at university getting my fashion degree, and I began to see that I could apply what I learned to Kitchen design.
It all started when I found “standard” placement practices for some appliances just didn’t work.
Microwave Placement
The appliance placement that I struggled with the most in my early designs was the microwave.
20 plus years ago, this was an appliance that was becoming very popular in Kitchens.
It was an appliance that originally was purchase to sit on the countertop, but homeowners wanted it built in for a cleaner look.
The cabinet industry came up with the solution that place the microwave on a shelf in line with the other wall cabinets.
I found the microwave on a shelf too high to safely access it (especially for children) and not aesthetically pleasing.
I needed to come up with a way to build in a microwave that was safer and looked better.


My solution was to install the microwave in an 18″ to 21″ deep open shelf, place it between a “desk” drawer and a wall cabinet modified to the 18″ or 21″ depth.
This set up worked well for modular cabinetry, but when working with a custom manufacturer I would specify a custom unit.
Typically I would place the microwave beside the refrigerator to balance the depth of the microwave and allow for a nice transition from the deep refrigerator gable to a standard 12″ deep upper wall cabinet.
As you can see from the images above, I also experimented with single drawers, double drawers and even multiple drawers.
Occasionally I would make the cabinet wider and add a divider or two to provide a space for cookbooks.
Sometimes the multiple drawers were individual apothecary drawers, while other times they were faux just for a look.
Looking at this solution, yes, I would use this design solution in a contemporary kitchen.
I still feel it places the microwave at an ergonomic height for most users.
Also, by including the drawer under the microwave, it is slightly elevated from the counter providing a small landing space in front of the unit, allowing the microwave drawer to swing open & shut when something was placed on this counter.
I did come up with some additional solutions for placing the microwave that were not “standard”.


The microwave in the maple kitchen above was for a family where the children used the appliance a lot.
I specified placing the microwave into an open shelf unit with a wooden face frame at counter height.
To provide a good sized landing counter I flipped a drawer upside down to form a pullout countertop.
If and when the counter is no longer needed, the drawer can be flipped around.
The second example did place the microwave at the standard wall cabinet distance of 54″ from finished floor, but by placing it on an angle in a corner, the user is able to get quite close to the appliance making it fairly user friendly.
The corner unit had double doors above and a tambour appliance garage below providing great storage in this corner of the Kitchen.
The third solution placed a standard microwave in a niche covered by a tambour rollup door.
This setup showcased the high end wall oven and allowed access to the microwave the few times a week this client used it.
Looking at these three options, I would design a microwave that sat at counter height but I would probably design a thinner pullout counter rather than devote an entire drawer to it.
I would still consider installing a microwave in a corner, but would rethink the appliance garage front. Maybe a pocket door instead of tambour.
The hidden microwave is a good idea for clients that don’t use this appliance much, but still want to include one in their Kitchen.
There is now a variety of flip up and pocket door hardware on the market that I would employ for this in a contemporary Kitchen design.
Gas Cooktop Placement
Something I noticed when installing gas cooktops in client’s Kitchens was that the height of the grates could raise the cooking surface up to 2″ higher than the countertop.
For some of my clients, especially smaller women, this was making using the cooktop at that height awkward.


A solution I implemented quite frequently was lowering the cooktop cabinet when a gas cooktop was involved.
I would begin by measuring my clients floor to bent elbow height and then calculating the ideal height to have the the lowered counter placed at.
This height was, and still is, 5″ to 6″ below the bent elbow.
I would then often make this area a focal point in the Kitchen.
Examples above show a lowered cooktops a few different ways.
They include one with pullout stainless steel racks, one bumped out cooktop area and one a recessed cooktop area with pullout condiment rollouts on each side.
Yes, I would suggest this type of installation in a contemporary kitchen, especially for Universal Design or a Forever Kitchen.
It can make the kitchen much more functional for the variety of cooks now using the Kitchen.
On a side note, I had a client recently where I brought this up, and the solution was to purchase a cooktop that was specifically designed to recess into the countertop for a flush installation.
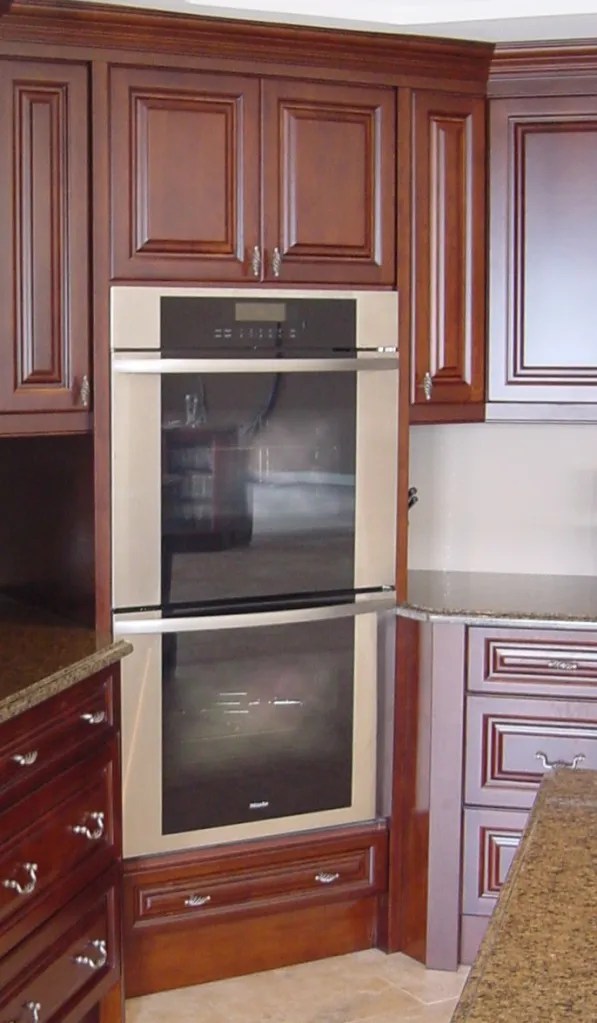
Wall Oven Placement
As single wall ovens were becoming more and more popular, the default installation was to stack them in a tall cabinet with a built in microwave above.
While that worked in some Kitchens, there were times when there wasn’t extra wall space, or we needed some additional counter space.


Because raised dining bars were popular at the time, I often extended the raised countertop and place the wall oven just under the counter.
This allowed the wall oven to be elevated for easier access.
I would often employ this solution when the client had a range but still wanted an extra wall oven.
In many cases this oven was placed in the bake center.
I still spend a lot of time placing ovens at a height that is functional for my clients.
In the right situation I would specify one in a raised countertop and possibly give it more of a hutch feel.
In most cases though, I recommend placing ovens in tall units at counter height with the controls at the client’s eye level.
A wall of built in appliances like this is very appealing as well as functional.
Corner Appliance Placement
Placing appliances in corners was something I suggested a lot of in my past projects.
I worked on a lot of renovations where the old Kitchen had the refrigerator and range side by side and by placing the cooking zone in the corner I was able to separate the two.


A feature that I would often specify when placing the range or cooktop in the corner, was to install a heat lamp behind the hood directed on a raised counter behind the appliance.
This was a great place to warm plates and to keep cooked items warm.

The popularity of double ovens also had me scrambling to find a place for them in renovations.
Often the corner was the best place to install these appliances if there was not a lot of continuous wall space.
It also helped me ensure drop off counter space for the ovens.
To make this tall unit less bulky feeling, I would recess it into the corner paying attention to how the wall cabinets either side of the corner unit would function.
When designing a renovation today, I still look closely at the corners to see if they can be utilized for appliance placement.
Most consumers don’t like their corner cabinets and are fine with having some void space around the appliance, as long as the placement makes their Kitchen function better.
Built In Coffee Machines


The built-in coffee maker made a big splash into the market place in the early 2000’s.
I remember seeing one in a “Street of Dreams” home, but I was a bit confused by where it had been placed.
The builder installed the coffee maker in a typical microwave wall cabinet 54″ off the ground!
It just looked off and later I found out that the beans are loaded into these machines from the top, and that the owner of that home was going to need a ladder to see into the top of this unit.
When I was first asked to include one into a Kitchen design, I chose my microwave on top of a drawer solution.
This gave a drawer below for expresso cups and few accessories like the frothing thermometer, which worked well.
I would also specify tall wall oven cabinets for the coffee maker, placing the cutout at counter height giving good accessibility to all users.
I did seen some designers specifying coffee makers under the countertop, but I felt this was too low.
My solution in a few of my projects was to install them in a raised base cabinet, providing a small drop off counter above and a wall cabinet to the counter above for all the coffee making paraphernalia.
Dishwasher Placement
As I stated earlier, I was doing a lot of research on ergonomics at the time.
This lead me to propose raising the dishwasher to some of my clients.
When you think about functionality, the raised dishwasher is more accessible for taller people and those using a wheelchair.


In the first example you see the raised dishwasher as part of a grouping where the microwave is placed directly above it and a coffee station to the right.
This produced an installation that worked well in this family’s home, where dad was tasked with clean up and loved his morning expresso.
The second example was interesting in that there were existing windows in the space that were not being changed.
They were 35″ from finished floor and I specified all the countertops at 35″ with the counter running into the window as the sill.
Dishwashers at the time needed to fit under a 36″ high counter so the solution was a raised dishwasher in the corner.
It worked well for these taller clients, and the corner unit provided a tall unit that echoed a wall oven stack to the left of the large window.
The third example is a pic of the Kitchen I designed for my family in 1997.
The large corner unit balanced a corner pantry on the other side of the window seat and provided good asymmetrical balance when viewing this Kitchen from the greatroom.
I really liked the functionality of the raised dishwasher in my own home, and my 6’3″ teenager felt this was how all dishwashers should be installed!
I would definitely recommend a raised dishwasher in a contemporary Kitchen.
My approach would be to use a fully integrated dishwasher to have it blend in with the rest of the cabinetry.
And since many Kitchens now include two dishwashers, a raised on and an under counter one would be a nice touch.
Pairing Appliances
Since there was a lot of new appliances hitting the market 20 years ago I was constantly looking for creative ways to incorporate them into my client’s Kitchens.
Here a few pics of some that stand out for me.


This first picture is of an appliance set up in the live kitchen I had in my showroom.
To accommodate all of the appliances I wanted to feature, I ended up stacking a built in coffee maker on top of a dishwasher.
I specified a piece of quartz countertop between the two to avoid any steam or heat transfer from the dishwasher to the coffeemaker.
The second example was in a guest suite where we were including a small satellite Kitchen.
The coffee maker would be used the most so it was placed at counter level, with the less used microwave above it.
Across the aisle was a small sink and a dishwasher drawer making this the perfect set up of guests in this home.
The third example was an interesting one.
This was a Kitchen renovation where the clients were going from a 30″ wide refrigerator to a 36″ wide one and they wanted to add a wine fridge and find a better place for the microwave.
My solution was to group all of these items at the end of the Kitchen and surround them with stained wood to match the island. (The rest of the Kitchen had white painted doors)
To balance all of the stainless steel, I specified the cabinet door above the microwave to have stainless steel mesh inserted.
The arched open shelf above everything pulled it all together, producing an armoire affect for this Kitchen.
I am always looking for creative non-traditional ways to design appliances into my client’s Kitchens so, yes, I would repeat many of these solutions today.
My philosophy is “form follows function”, believing that if you get the function right, you can then work on the aesthetics or form.
I would love to hear about any unique Kitchen design solutions you have designed in the past or recently.
Please leave me a comment below.
Next week I will showcase some other design solutions I have incorporated into my client’s Kitchens in the past.
I hope you will join me!
To receive the VESTA Blog in your in box subscribe here.
[hubspot portal=”9253671″ id=”40a54a75-0df5-4740-9983-80e00fb4adde” type=”form”]
Jan Rutgers has been designing kitchens and products for over 25 years and is a recipient of Kitchen & Bath Design News’ Top Innovators in 2020 for the Kitchen & Bath Industry. She has designed more than 1000 kitchens learning valuable skills with each one! Her experience in Kitchen Design, Millwork Manufacturing and Product Development has led her to create VESTABUL SCHOOL OF DESIGN where she educates and mentors people passionate about the Kitchen Design Industry.

Pingback: Revisiting Vestabul Kitchen Design Solutions from the Past: Metal Accents – VESTABUL SCHOOL OF DESIGN
Pingback: Revisiting Vestabul Kitchen Design Solutions from the Past: Cabinet Accessories – VESTABUL SCHOOL OF DESIGN
Pingback: Revisiting Kitchen Design Solutions from the Past: Details – VESTABUL SCHOOL OF DESIGN